

Preventing Mould in Indoor Grow Setups: 7 Steps
Table of Contents
- Why Mould Thrives in Indoor Grow Environments
- Step 1: Monitor Humidity Levels with a Hygrometer
- Step 2: Control Grow Tent Humidity with Dehumidifiers and Ventilation
- Step 3: Optimise Airflow and Ventilation for Indoor Grows
- Step 4: Space Plants and Prune to Reduce Dense Foliage
- Step 5: Water Carefully and Avoid Overwatering
- Step 6: Prevent Mould in Hydroponic Systems
- Step 7: Clean a Grow Tent After Harvest to Stop Mould Returning
- Frequently Asked Questions
Last Updated: October 14, 2026
Why Mould Thrives in Indoor Grow Environments
Mould and mildew appear without warning, spread fast, and destroy plants before you notice.
Indoor grow environments create the perfect storm for fungal growth: warm temperatures, high humidity and stagnant air.
Mould is everywhere in nature; the problem is that grow tents trap moisture and limit air movement, creating microclimates where humidity spikes and air becomes still.
Preventing mould involves focusing on three factors: humidity control, airflow, and watering discipline. Get these right and mould becomes rare; ignore them and you'll lose crops.
Step 1: Monitor Humidity Levels with a Hygrometer
You can't control what you don't measure. A hygrometer is your first line of defence against mould in indoor grow setups, but only if you read the whole environment, not one spot at one moment.
Relative humidity (RH) is the moisture in the air compared to how much it can hold at that temperature. Warm air holds more moisture than cool air, so the same water vapour gives a higher RH reading in a cool tent at night than in a warm tent during lights-on, which explains most condensation and mould problems indoors.
Humidity and temperature targets by growth stage
Work to a band that suits the growth stage. These are widely used targets for common indoor crops; adjust for the species you grow.
| Stage | Lights-on temp | Lights-on RH | Lights-off temp | Lights-off RH |
|---|---|---|---|---|
| Propagation / seedlings | 22-26°C | 65-75% | 20-24°C | 65-75% |
| Early vegetative | 22-28°C | 55-65% | 20-24°C | 55-65% |
| Late vegetative | 22-28°C | 50-60% | 20-24°C | 50-60% |
| Early flowering | 20-26°C | 45-55% | 18-22°C | 45-55% |
| Late flowering | 20-26°C | 40-50% | 18-22°C | 40-50% |
Two rules sit behind the table. Keep the lights-off temperature within about 5°C of lights-on: a large night-time drop pushes air past its dew point and deposits water on leaves, tent walls and buds, exactly where mould starts.
Where to place sensors to catch microclimates
A single room reading hides the pockets where mould actually forms. Most practitioners need at least two: one at canopy height in the middle of the plant mass, and one near the exhaust or top of the tent to show how much moisture is being carried away.
- Canopy height, mid-tent: this is the air your leaves sit in. Mount the probe so it is shaded from direct lamp heat but still in the plant zone.
- Top of the tent, near the exhaust: shows whether humid air is actually leaving or pooling under the roof.
- Inside a dense canopy: push a probe into the thickest foliage. If it reads 5-10% higher than the canopy edge, you have a humid pocket and need more internal airflow, not more extraction.
- Near the intake: confirms incoming air is drier than tent air. If intake RH is higher, ventilation is working against you and a dehumidifier becomes necessary.
A useful diagnostic: compare canopy and exhaust readings. A gap under about 5% RH means air is exchanging well; a large gap means moisture accumulates in the plant zone faster than it is removed.
Logging, alarms and automation
Spot checks miss the spikes that matter. A min/max hygrometer records the highest and lowest readings between visits, so you can see whether humidity climbed overnight or after watering. The Gorilla Min/Max Thermo-Hygrometer with Probe does this with a remote probe, which lets you leave the display outside the tent and the sensor inside the canopy.
A controller that switches fans and dehumidifiers at set RH thresholds removes the need to be present at the right moment.
Step 2: Control Grow Tent Humidity with Dehumidifiers and Ventilation
Controlling humidity in a grow tent means removing excess moisture before it becomes a problem, via ventilation and dehumidification.
Size your exhaust fan to replace all the air in your tent every 1-3 minutes.
The Gorilla Total VPD Control Kit integrates both ventilation and humidity control into one system.
Without active humidity control, indoor grow tents will develop mould. It's not a question of if, it's when.
Step 3: Optimise Airflow and Ventilation for Indoor Grows
Ventilation removes humid air; airflow keeps air moving inside the tent so moisture doesn't settle on leaves. A tent can have good ventilation but poor airflow, and both matter for preventing mould.
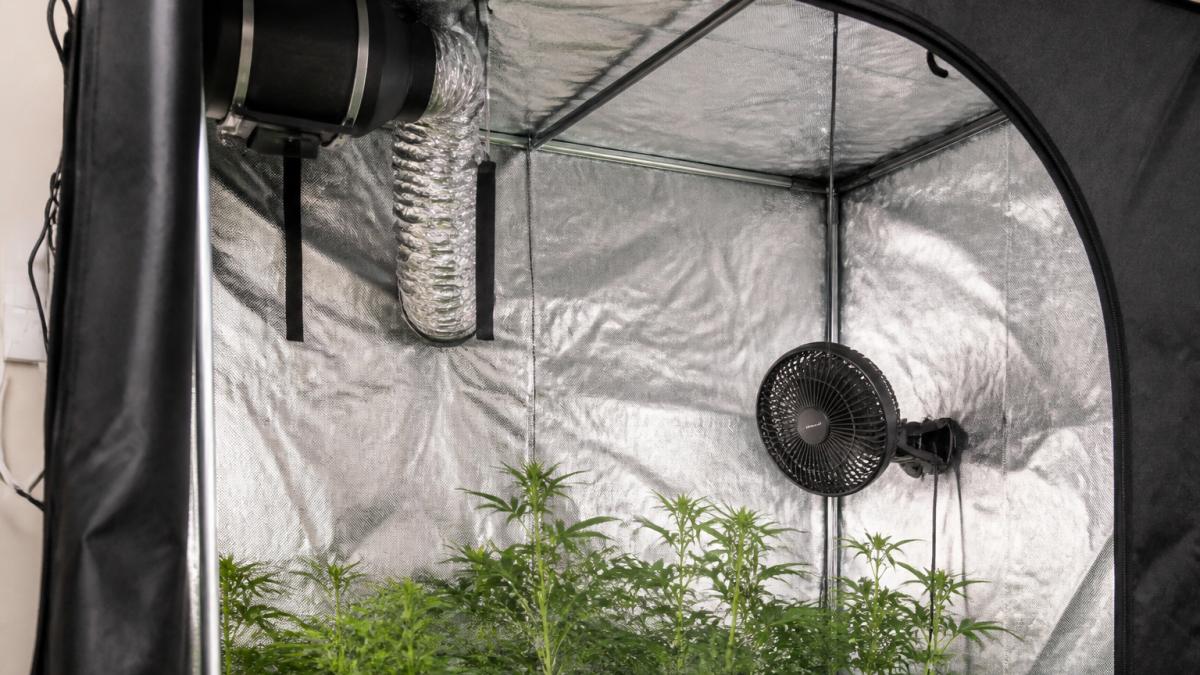
Sizing extraction to the room, not to habit
Work from the volume of the growing space. A tent 1.2 m wide, 1.2 m deep and 2 m tall holds about 2.9 cubic metres of air, so replacing it every 1-3 minutes needs an extractor rated at roughly 1-3 cubic metres per minute, before allowances.
Then add allowances, because a fan's quoted figure is measured in free air:
- Ducting and bends: every metre of flexible duct and every 90-degree bend reduces effective flow. A long, kinked run can lose a third or more.
- Carbon filter: a filter on the extractor reduces flow, so size the fan above the bare room figure if you run one.
- Heat load: high-wattage lighting raises temperature, so the fan must shift more air. Run extraction harder in warm weather; in cold weather use a controller so you don't pull all the heat out.
Set extraction for slight negative pressure: the walls should bow in gently when the extractor runs and the door is closed, confirming air is drawn in through the intake rather than leaking out through seams.
Positioning circulation fans
Circulation means moving air through the plant mass, not blasting the tops of plants.
- One fan across the canopy: aim it so air travels horizontally just above the growing tips, then deflects down into the foliage.
- One fan low, angled upward: this lifts cool, damp air off the floor and media and pushes it toward the extractor.
- Oscillation over fixed direction: a gently oscillating fan covers more canopy over time and avoids drying or damaging one spot.
Air should move gently: enough that leaves rustle slightly when you watch for 30 seconds, not so much that stems bend. Aggressive wind damages leaves and causes wind burn.
Mount the extractor at the top of the tent where warm, humid air collects, and run ducting outside or to another room.
Diagnosing a mould symptom: a short decision path
When you find mould or a suspicious damp spot, the fix depends on the cause. Work through this in order.
- Is the affected area in a corner, behind equipment, or inside dense foliage? If yes, this is a dead spot. Add or reposition a circulation fan before changing anything else.
- Is the canopy reading much higher than the exhaust reading (more than about 5-10% RH)? Moisture is accumulating faster than it is being removed. Increase extraction or add a dehumidifier.
- Is the mould on leaves that were wet, or on the growing media surface? This points to watering practice rather than airflow. Water at the base, and stop wetting foliage.
- Is there condensation on tent walls, ducting or the inside of the roof? This is a temperature problem, usually a large lights-off drop. Narrow the day/night temperature gap and raise night-time air movement.
- Is the mould recurring in the same spot after cleaning? Check for a hidden reservoir: damp ducting, a leaking reservoir, pooled water under a tray, or uninsulated cold surfaces where condensation forms.
Work through these in order and you'll usually find one dominant cause. Fix that, then re-measure before making further changes.
Gorilla Total VPD Control Kit (Up to 50m2 coverage) →
Step 4: Space Plants and Prune to Reduce Dense Foliage
Dense foliage traps humidity: leaves touching, stacked canopies and overgrown plants create microclimates where mould thrives.
Leave at least 15-20 centimetres between plants so air flows freely around each one.
Pruning is equally important.
Pruning isn't just removing foliage: you're creating pathways for air through the canopy and reducing the surface area where moisture accumulates.
Many growers resist pruning, thinking it reduces yield.
Prune regularly throughout the growing season, before the plant is overgrown.
Step 5: Water Carefully and Avoid Overwatering
Overwatering is one of the biggest mould triggers: wet media stays damp, roots sit in moisture and tent humidity climbs.
Water only when the top inch of growing media feels dry, usually every 2-3 days rather than daily.
Water at the base, not the leaves. Wet leaves take hours to dry in a humid tent, and wet leaves are mould magnets while dry leaves resist it.
For soil or coco growers, ensure your media drains well.
The goal is moist growing media, not wet.
Step 6: Prevent Mould in Hydroponic Systems
Hydroponic systems have unique mould challenges because water is always present.
Keep your reservoir clean. Change water every 2-3 weeks.
Prevent algae in the reservoir. Algae consumes oxygen and creates the anaerobic conditions where mould thrives.
Inspect irrigation lines regularly. Mould can colonise inside tubing where you can't see it.
Hydroponic systems are efficient but demand more attention to cleanliness than soil growing.
Step 7: Clean a Grow Tent After Harvest to Stop Mould Returning
Mould spores survive in your tent between crops.
Remove all plant material. Dead leaves, roots, and debris are mould food. Take everything out.
Inspect and clean your fans and filters. Dust and debris in fans reduce airflow.
Check your ducting. Mould can grow inside it; if you see discolouration, replace it.
Preventing mould in indoor grow setups isn't complicated, but it requires discipline.
| Step | Focus | Frequency |
|---|---|---|
| Monitor humidity | Use a hygrometer to track relative humidity levels | Daily (morning and evening) |
| Control humidity | Use exhaust fans and dehumidifiers | Continuous during lights-on |
| Optimise airflow | Position circulation fans and exhaust vents | Continuous during lights-on |
| Space and prune | Remove dense foliage and space plants | Weekly during growing season |
| Water carefully | Water at base, avoid overwatering | Every 2-3 days (soil dependent) |
| Maintain hydroponic systems | Clean reservoir, prevent algae, monitor temperature | Weekly inspections |
| Clean after harvest | Remove all plant material and disinfect tent | After every harvest |
Frequently Asked Questions
What humidity level should I maintain to prevent mould in my indoor grow setup?
Relative humidity between 40-60% is ideal for most plants during vegetative growth; reduce to 30-50% during flowering to minimise mould risk. Use a hygrometer to monitor levels continuously. If humidity exceeds 70%, mould and mildew develop rapidly. The Gorilla Min/Max Thermo-Hygrometer with Probe tracks both current and peak humidity, helping you spot dangerous spikes before fungal growth takes hold.
Can overwatering increase mould risk in an indoor garden?
Yes. Overwatering raises soil moisture and air humidity, creating ideal conditions for fungal growth. Water only when the top 2-3 cm of growing media feels dry. In hydroponic systems, maintain reservoir temperature below 20°C and use an air stone to increase dissolved oxygen, which suppresses algae and mould. Check water levels weekly and change reservoirs between crops to prevent buildup of organic matter that feeds fungal spores.
How often should I clean my grow tent to prevent mould?
Inspect your tent weekly for early signs of mould or mildew on leaves and surfaces. Deep-clean between harvest cycles: remove all dead leaves and plant debris, wipe down all internal surfaces with a biodegradable cleaner like HyClean, and allow the tent to dry completely before restocking. During the growing cycle, remove dead foliage immediately and wipe damp surfaces with a dry cloth to prevent spore germination.
What equipment do I need to control humidity and prevent mould?
A hygrometer to measure humidity, exhaust fans to expel moist air, circulation fans to move air across the canopy, and a dehumidifier if your space is naturally damp. For advanced control, the Gorilla Total VPD Control Kit (up to 50 m² coverage) automates humidity and temperature management by monitoring Vapour Pressure Deficit, ensuring your plants breathe efficiently and mould risk drops significantly. This is especially valuable if you're managing multiple zones or a larger setup.