

How Far Should LED Grow Lights Be From Plants?
Last Updated: November 8, 2026
Quick Summary
There is no single hanging height for LED grow lights: it depends on fixture strength, growth stage and canopy coverage. Start seedlings around 60 to 90 cm above the tray, run vegetative growth at roughly 45 to 60 cm, and move to about 30 to 45 cm in flowering. Then fine-tune with a dimmer or PAR meter.
- Light intensity drops fast with distance, so distance is really a tool for controlling intensity.
- Signs LED grow lights are too close include bleached patches, curled or crispy edges and stalled growth.
- Stronger fixtures need more distance or less power, and dimming gives you a second lever beyond height.
- If corner readings are more than about 20 to 30 percent below the centre, lower the fixture or add a second one.
- Change height by 5 to 10 cm at a time and wait three to five days before judging plant response.
Table of Contents
- Why Hanging Height Decides How Well LED Grow Lights Work
- Grow Light Height for Seedlings and Young Plants
- Hanging Distance Through Vegetative Growth and Flowering
- An LED Grow Light Distance Chart You Can Work From
- Signs Grow Lights Are Too Close to Plants
- How Long to Leave Grow Lights on for Seedlings
- Matching Distance to Fixture Strength, Dimming and Canopy Coverage
- Choosing the Right LED Grow Light and PAR Meter for Your Space
- Frequently Asked Questions
Why Hanging Height Decides How Well LED Grow Lights Work
How far should LED grow lights be from plants? There is no single number, and that is the first thing to understand. The right hanging height depends on how strong your fixture is, what stage your plants are at, and how much area you need to cover.
A common mistake is copying a figure from a forum post and applying it to every crop in every tent.
Light intensity drops fast with distance. Move a fixture further away and you spread the light wider but weaker. Move it closer and you concentrate it, which can burn tender leaves.
Distance is really a tool for controlling intensity. Get the height roughly right, then fine-tune with a dimmer or a light meter.
Grow Light Height for Seedlings and Young Plants
Seedlings need gentler light than mature plants. Guidance on seedling distance varies, but young plants can suffer stress, bleaching or stunted growth under overly intense light.
A simple approach for new growers:
- Start high, around 60 to 90 cm above the tray
- Watch for pale or stretched leaves in the first week
- Lower the fixture slowly once plants look settled
- Keep the light centred so seedlings grow straight
If you are raising herbs specifically, our guide to the best LED grow lights for herbs covers crop-specific picks that suit small spaces and delicate seedlings.
Hanging Distance Through Vegetative Growth and Flowering
Distance guidance shifts as plants move through their stages. Recommended distances for full-spectrum LEDs vary by manufacturer and growth stage, so treat any single range as a starting point.
In practice, we would work it like this:
- Vegetative stage: around 45 to 60 cm, then raise as the canopy fills out
- Flowering stage: closer, often 30 to 45 cm, to push intensity
- Late flower: watch leaf edges daily, as buds sit closer to the fixture
The real difference between a good and a poor result here is observation. Plants tell you when the height is wrong. For growers focused on leafy crops, our picks for the best grow lights for leafy greens are chosen with this stage-by-stage adjustment in mind.
An LED Grow Light Distance Chart You Can Work From
Use this as a starting point, not a fixed rule. Every figure below assumes a full-spectrum fixture at moderate power. Adjust up for stronger lights and down for weaker ones.
| Growth Stage | Starting Distance | Watch For | Adjustment |
|---|---|---|---|
| Seedlings | 60-90 cm | Pale leaves, stretching | Raise if stressed |
| Young plants | 45-60 cm | Curled edges | Raise slightly |
| Vegetative | 45-60 cm | Leggy growth | Lower gradually |
| Flowering | 30-45 cm | Bleached tips | Raise or dim |
| Succulents | 30-45 cm | Colour fading | Lower for more light |
Starting Distance
For greenhouse setups, where light competes with natural sun, our roundup of the best grow light for a greenhouse explains how to pick fixtures that cope with that mixed environment.
Signs Grow Lights Are Too Close to Plants
The clearest signs grow lights are too close are bleached patches on upper leaves, curled or crispy edges, and stalled growth. These symptoms usually appear on the leaves nearest the fixture first.
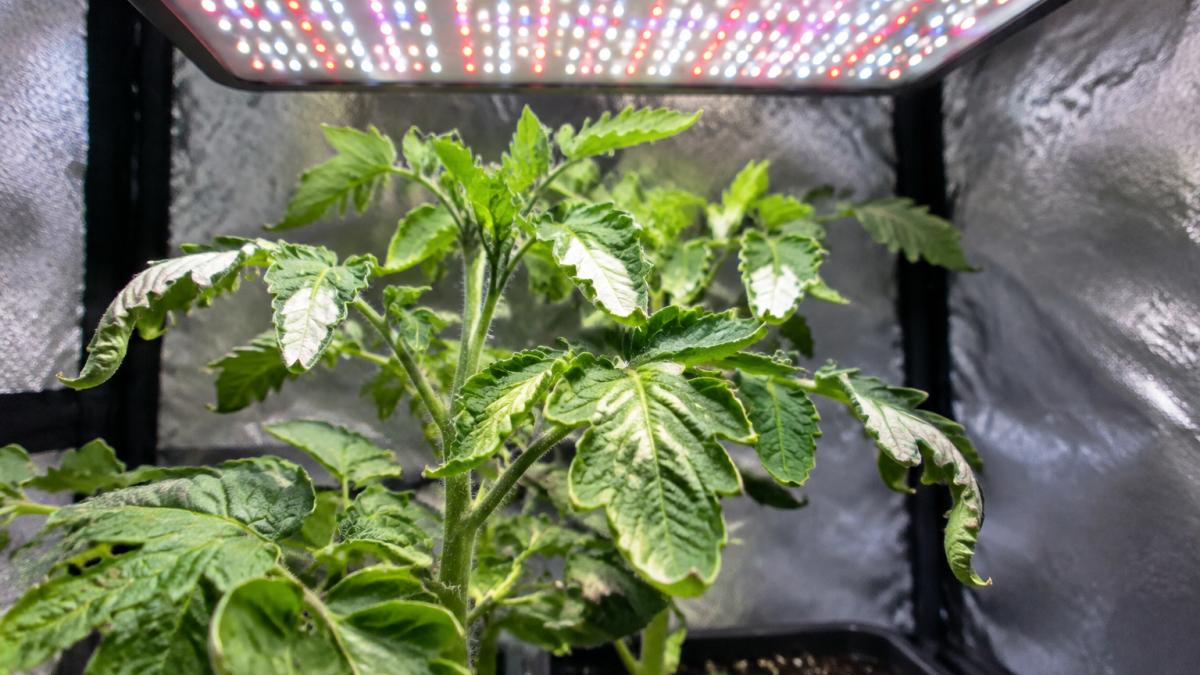
Light burn and leaf bleaching happen when light intensity overwhelms the plant's ability to use it. Raising the fixture and watching the plant for a week is a common approach.
Other warning signs include:
- Leaves turning yellow between the veins
- Dry, papery texture on top growth
- Buds that stop developing under strong light
If you spot these, act quickly. Damage to top leaves slows the whole plant.
How Long to Leave Grow Lights on for Seedlings
Seedlings need a dark period to rest as well as light, so the dark hours matter as much as the light.
Set a timer rather than switching the light by hand. Consistency helps plants settle into a rhythm, and it stops you leaving a light on for days by accident.
Watch out: running a light 24 hours a day does not speed growth. It often stresses young plants and wastes energy.
Matching Distance to Fixture Strength, Dimming and Canopy Coverage
Stronger fixtures need more distance, or less power. Our buyer's guide to high-performance LED grow lights explains how output figures translate into real hanging heights. But output is only half the story: two fixtures with the same wattage can need very different hanging heights because of how they spread light.
Why fixture design changes the right height
A panel with a wide beam angle throws light broadly and can sit closer to a small canopy without a hot centre. A bar or strip fixture spreads diodes across a long footprint, so it usually hangs lower and more evenly over a rectangular bed. A focused or reflector-style fixture concentrates light into a narrower cone, which means it must hang higher to avoid a bright hotspot directly beneath it. This is why universal distance rules fail: the same 45 cm height can be gentle under a strip light and aggressive under a focused panel.
Dimming as a second lever
Take a fixture like the Maxibright MaxiLED Pro DUAL 2290 860W. It delivers 2290 μmol/s and covers a 1.5 x 1.5m area. With that much output, you would hang it higher or dim it rather than run it at full power over small plants. Its built-in dimmer runs at 25, 50, 75 and 100 percent, which gives you a second lever beyond height.

For smaller spaces, the Maxibright Daylight LED 200W Pro covers a 0.8 x 0.8m area. Matching fixture strength to your footprint is what keeps coverage even across the whole canopy.
A useful rule of thumb: if you are running a high-output fixture at 25 percent over seedlings, you can usually bring it closer than the chart suggests, because the dimmer is already doing the intensity reduction.
Mapping coverage across the canopy
Distance alone does not tell you whether the plants at the edges of your tent are getting enough light. A fixture rated for a 1.5 x 1.5m area will still have a brighter centre and dimmer corners. To check coverage:
- Measure light at the centre, at the midpoint of each side, and at each corner of the canopy.
- If corner readings are more than about 20 to 30 percent below the centre, either lower the fixture, add a second fixture, or accept that edge plants will need more time.
- Rotate pots weekly so no plant sits permanently in the dimmest spot.
Watch out: raising a single fixture to fix a hot centre also weakens the edges, so if your corners are already low, dimming rather than raising is usually the better move.
For greenhouse setups, where light competes with natural sun, our roundup of the best grow light for a greenhouse explains how to pick fixtures that cope with that mixed environment.
Choosing the Right LED Grow Light and PAR Meter for Your Space
A PAR meter takes the guesswork out of hanging height. It measures the light your plants actually receive, so you can set distance by data rather than by eye.
The Maxibright PAR Meter measures from 0 to 3999 μmol/m²/sec and can be used to test any grow light. It lets you build a repeatable routine:
- Hang the light at the chart height for your stage
- Measure at canopy level in the centre and at the corners
- Raise or dim until readings are even across the canopy
- Repeat whenever plants grow taller
Turning readings into PPFD and DLI targets
A distance chart tells you where to start; a meter tells you whether you have arrived. The number to watch is PPFD, photosynthetic photon flux density, measured in μmol/m²/sec at canopy level. Growers commonly aim for roughly:
- Seedlings and cuttings: 100 to 300 μmol/m²/sec
- Vegetative growth: 300 to 600 μmol/m²/sec
- Flowering and fruiting crops: 600 to 900 μmol/m²/sec, with some high-light crops tolerating more
These are starting bands, not guarantees. Shade-tolerant foliage plants sit at the low end; succulents, tomatoes and chillies sit at the high end. Once you have a PPFD reading, you can calculate daily light integral (DLI) by multiplying PPFD by the number of light hours and a conversion factor. As a rough guide, 400 μmol/m²/sec for 16 hours delivers a DLI in the low 20s (mol/m²/day), which suits many vegetative crops. If your DLI is low, you can either raise PPFD (closer or brighter) or extend the photoperiod, but extending hours has diminishing returns and can stress plants if pushed too far.
A repeatable adjustment protocol
Rather than chasing a single perfect height, work in small steps:
- Change height by 5 to 10 cm at a time, never more.
- Wait three to five days before judging the plant response.
- Re-measure PPFD after every change and note it alongside the date.
- Keep a simple log: stage, height, dimmer setting, centre and corner PPFD, and any leaf symptoms.
This log is what turns generic advice into a routine that fits your fixture and your space. After two or three cycles you will know your own tent's numbers better than any chart.
Watch out: a phone light-meter app can be useful for comparing relative readings across a canopy, but it is not calibrated like a dedicated PAR meter, so do not treat its absolute numbers as PPFD targets.
Distance, dimming and coverage all work together. Get those three right and plant response follows.
Hanging height is not a fixed number you memorise once. It is a setting you adjust as plants grow, and the growers who get the best results are the ones who watch their leaves and measure their light.
Frequently Asked Questions
How far should LED grow lights be from seedlings?
Most LED grow lights should sit at a moderate height above seedlings, and the right distance depends on your fixture. That gap matters because young plants can suffer stress, bleaching or stunted growth under overly intense light. If your fixture is dimmable, you can hang it slightly lower and run it at 25-50% power instead. Check the leaves after a few days: if they look pale or curled at the edges, raise the light a little; if the seedlings stretch towards it, lower it.
Can LED grow lights be too close to plants?
Yes. Light intensity rises sharply as you move a fixture closer to the canopy, and recommended ranges vary by manufacturer and fixture. Too close means leaf bleaching, curled or crispy edges, and stalled growth. The fix is simple: raise the fixture by 10-15 cm, dim it if you can, and give the plant a week to recover before adjusting again. A PAR meter removes the guesswork entirely.
How do I know if my grow light is too far away?
The clearest sign is stretching: seedlings and young plants grow tall, thin stems with wide gaps between leaves as they reach for light. You may also see slow growth and pale, small leaves. Lower the fixture by 10-15 cm or increase the dimming level, then watch new growth over the next week. Keeping a written note of hanging height and dimmer setting each time you adjust makes it much easier to spot what worked.
Should I raise my LED grow light as my plants grow?
Yes. As plants grow taller, the canopy moves closer to the fixture, so the light intensity at leaf level increases. A fixture sitting 40 cm above a seedling may end up 15 cm above a flowering plant if you never move it. Check the gap every week and raise the light to keep your target distance, or dim it if headroom in the tent is limited.
